Do you know that up to 96.7 percent of your website visitors are NOT ready to buy? Or that a prospect needs to hear from you at least 7 times before they’d buy (aka the Rule of 7)?
Given these sobering statistics, it makes sense to consider investing in Facebook retargeting (or remarketing) ads.
But what is retargeting or remarketing all about? Why should you consider this form of online advertising?
In this article, I will describe how retargeting works, and provide a step-by-step guide on how you can launch your first Facebook retargeting ad campaign.
Ready to boost your Facebook advertising performance? Let’s go!
Benefits of Retargeting and Remarketing Ads
There are various reasons for you to consider Facebook remarketing ads. (Yes, they can sometimes be annoying, but there must be a reason why advertisers keep using them!)
Here are some interesting statistics on the effectiveness of retargeting ads:
- Retargeting can lead to a 726% increase in site visits over a 4 week period (source).
- Retargeting ads lead to a 1046% increase in branded search (source).
- The average cost per acquisition of remarketing ads is 32% lower than from regular search ads (and 65% lower than regular display) (source):
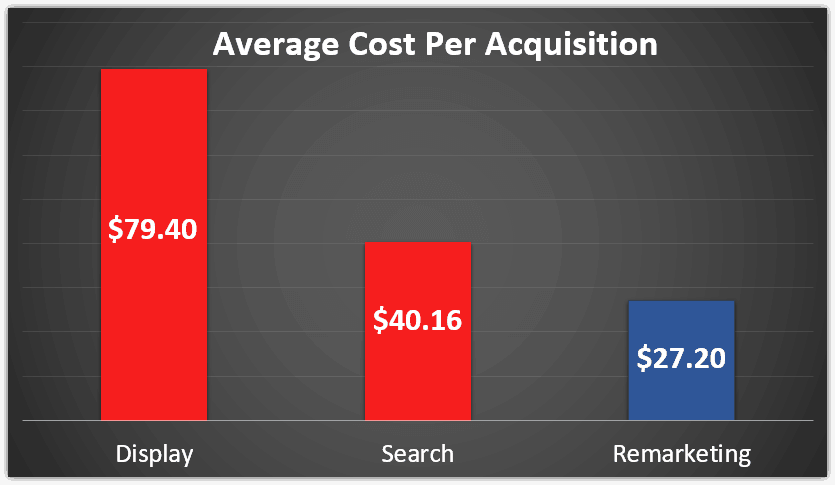
Courtesy of Growth Badger
But that’s not all. From a qualitative perspective, retargeting ads can serve the following purpose:
- Generate More Sales: This is especially relevant for e-commerce businesses that have an online shop
- Generate More Leads: For service based businesses that do not have a direct-to-sales offer, retargeting can help you to attract more leads by getting interested parties to opt-in
- Improve Brand Awareness: Retargeting ads by virtue of their frequency can help to increase awareness for your brand
- Reach Lukewarm Prospects: By bringing your potential customers back into your communication stream, remarketing can help to convert prospects who expressed interest but decide to back out
- Increase Return On Investment (ROI): Unlike other forms of advertising, the higher click through rate (CTR) and lower cost per acquisition will help you to generate better ROI on your Facebook Ad Campaigns
Now that you’re hopefully more convinced on the benefits of retargeting, let us look at what it involves.
What is Retargeting?
Retargeting or remarketing is an online advertising strategy where you target specific visitors who have either visited your website, signed up for an email list, downloaded an app, or performed any other activity. Often, it involves placing a “cookie” (which is an electronic tag) on their mobile or desktop browser, or other ways of identifying this user.
The cookie lets you recognize and “follow” your store’s visitors when they visit Facebook (or other websites), and to show a specific ad to him or her. Doing so helps to bring your prospect back to your website, albeit to the same or different landing page.
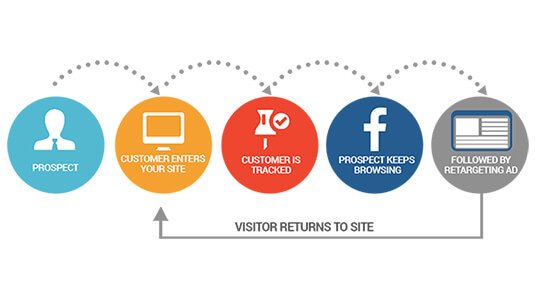
Courtesy of Marketing Unfolded
In the case of Facebook retargeting, this process is done by creating Custom Audiences comprising different categories of prospects or customers:
- Visitors to your website—detected by installing a Facebook Pixel on your website’s CMS
- Members of a Customer List
- People who downloaded or interacted with your app
- Users who interacted with your Facebook Page or Instagram Profile
We will go into each of these categories in detail below. Before that, however, there are several steps that you should take.
#1 Set Up Facebook Business Manager
First, consider setting up Business Manager (https://business.facebook.com) so that you can have access to the full suite of tools available for businesses.
Business Manager allows you to manage multiple Facebook pages and ad accounts within a single interface.
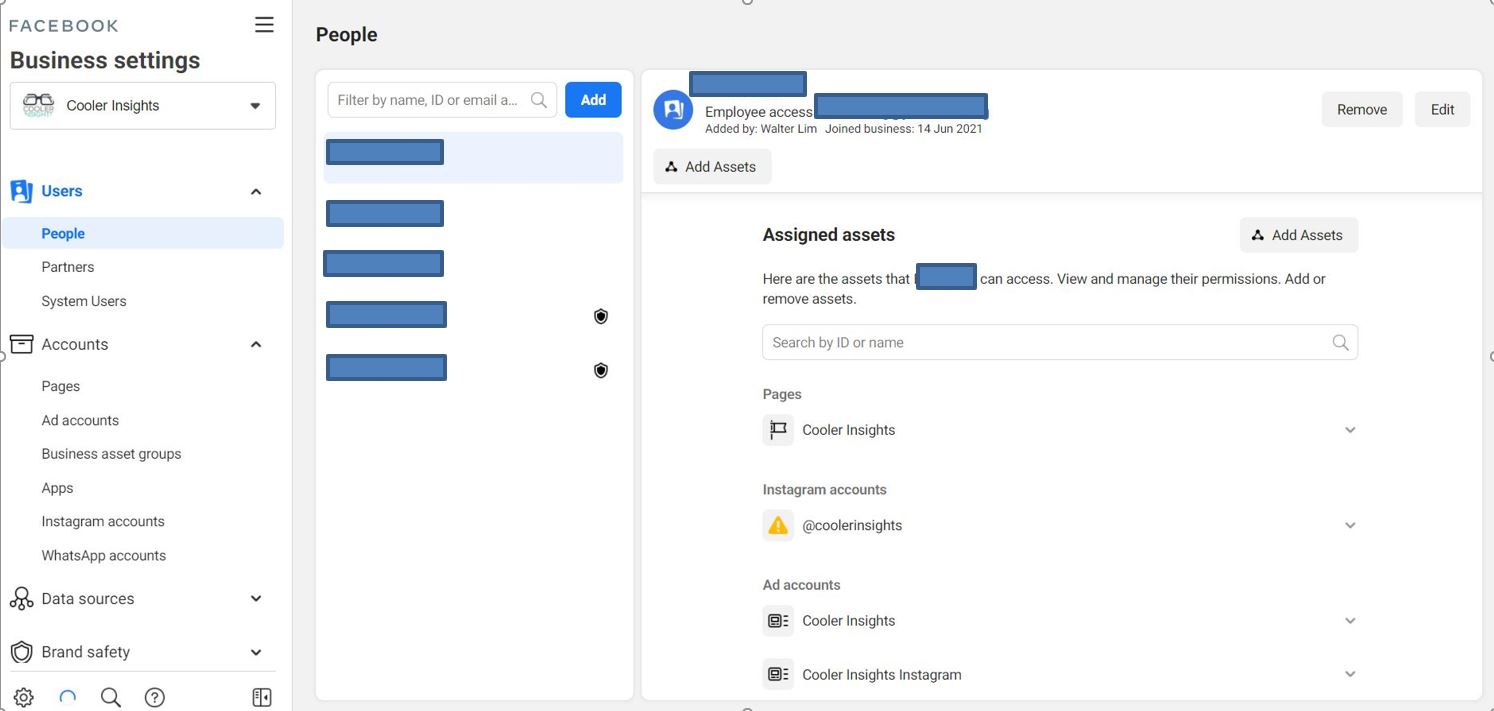
Beyond this, Business Manager also allows you to provide different levels of access to staff, vendors or partners. You can do these under the “Business Settings” tab.
You can also use Business Manager to create different categories of Custom Audiences and Lookalike Audiences to sharpen your retargeting ad campaigns.
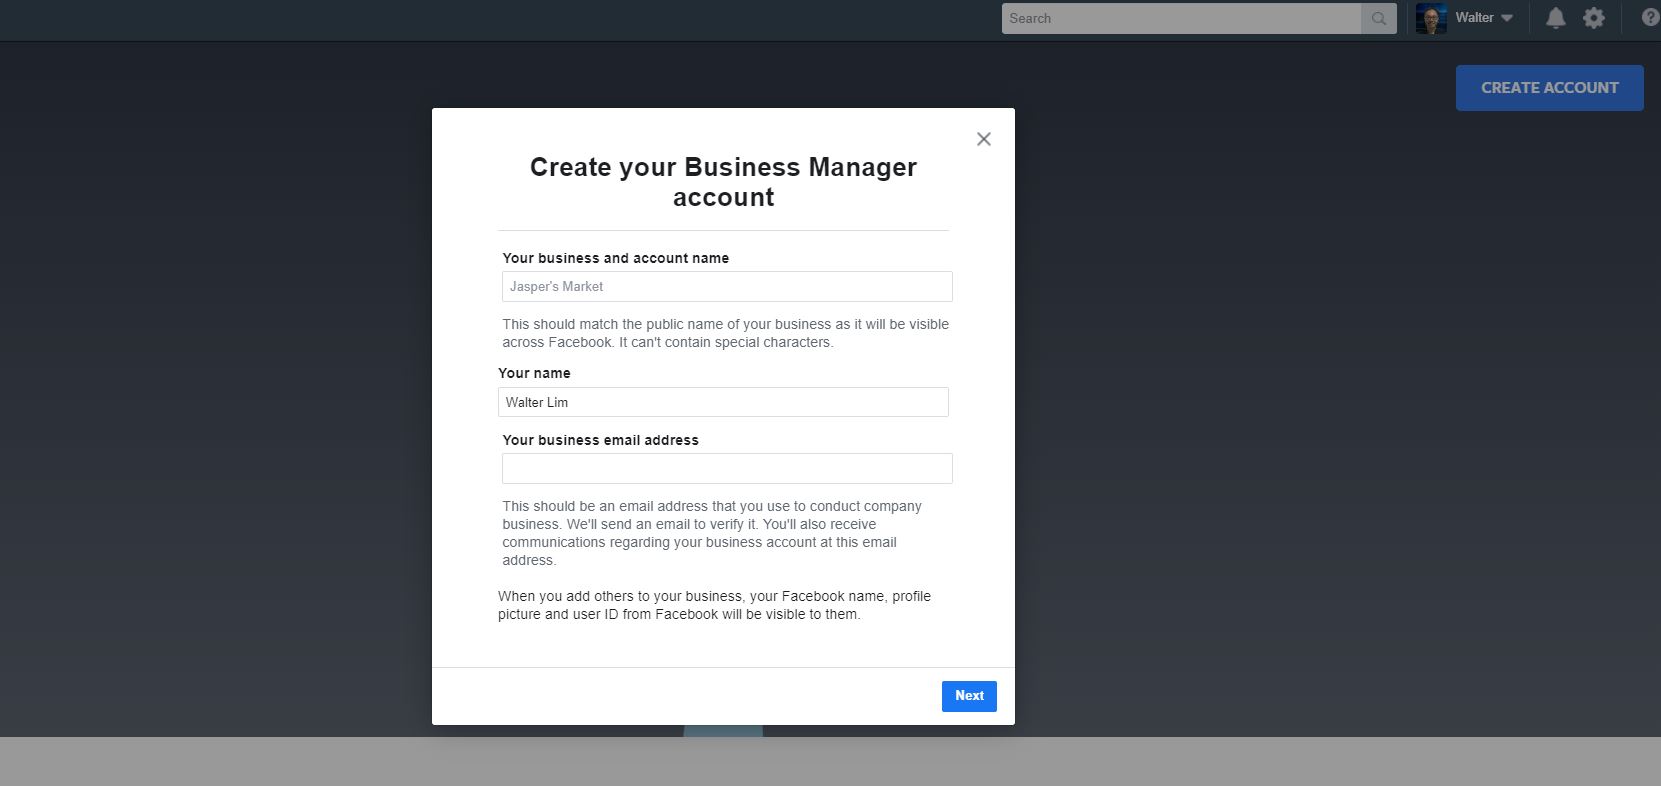
To start creating your own Business Manager account, visit this website, click on “Create Account” and follow the step-by-step instructions given.
Watch this video featuring Facebook ads guru Dennis Yim for an in-depth walkthrough of how you can do this.
#2 Install Facebook Pixel on Your Website
After you’ve set-up your Business Manager, you should consider setting up Facebook Pixel on your website. This is a piece of code similar to Google’s Tag which allows you to detect activity on your website from a user, tags them with a ‘cookie’, and show them specific ads when they’re set-up as Custom Audience.
Here are the steps you can take (taken from Facebook itself):
- Go to Business settings in Business Manager.
- Select your business.
- Click Data sources.
- Select Pixels.
- Click the + Add button.
- Enter a name for your pixel.
- Optional: Enter your website URL.
- Click Continue.
- To install your pixel on your website, click Set up the pixel now. If you’d like to stay in Business Manager, click Continue managing my business.
There are three ways to set up the pixel on your website.
![]()
a) Manually Add Facebook Pixel Code
For this step, you should first locate the ‘header code’ on your website.
 Once you’re able to do so, you can copy and paste your entire pixel code at the bottom of the header section, just above the closing head tag (ie between <head> and </head>).
After you’ve done so, click on the toggle to turn Automatic advanced matching on or off. You should then check that your code’s working correctly by entering your website URL and click “Send Test Traffic” to determine if it works. If your status says “Active”, your base code has been installed correctly (this may take a few minutes).
 b) Using Partner Integrations
![]()
This will be for website Content Management Systems (CMS) that have a partner relationship with Facebook.
- Go to the Pixels tab in Events Manager.
- Click Set up pixel.
- Click Use a partner integration.
- Select a partner from the list.
- Follow the on-screen setup instructions.
Here’s an example of how it’d look with WordPress. Simply follow the steps that are given.
![]()
c) Email Instructions to Developer
This may be the easiest if you prefer not to meddle around with your website CMS.
- Go to the Pixels tab in Events Manager.
- Click Set up pixel.
- Click Email instructions.
- Enter the recipient’s email address.
- Click Send at the bottom of the page.
#3 Set Up Your Custom Audiences
Now that you’ve got the pixel installed on your website, you need to now set up your different Custom Audiences.
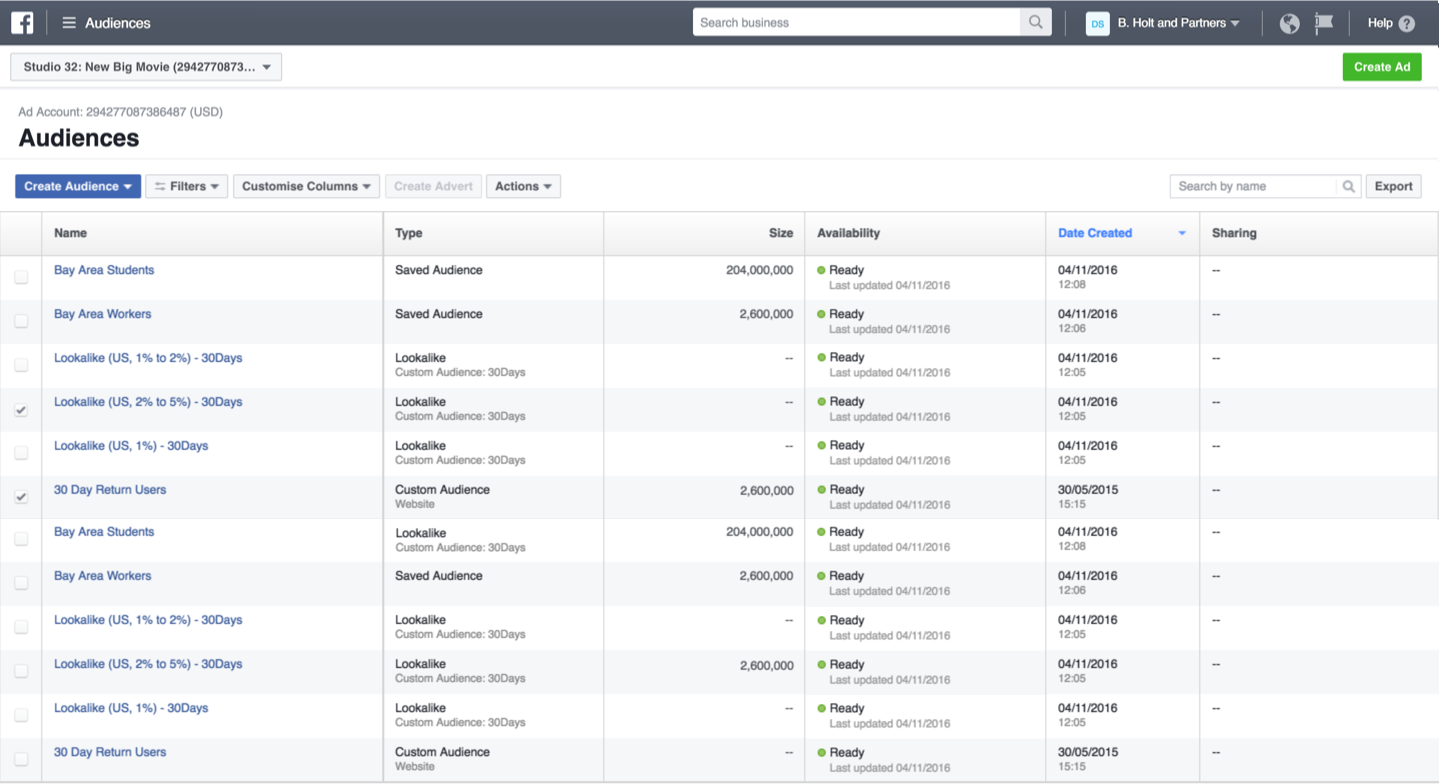
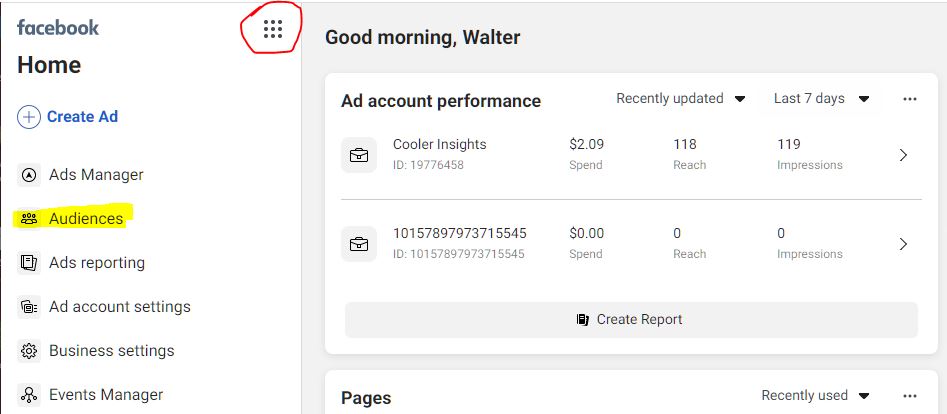
To get access to Audiences, you should log in to your Business Manager, and select the “Audiences” tab as follows:
From there, you should click on “Create New Audience” and choose “Custom Audience” as shown.

A screen will pop-up offering you different Custom Audience options as shown here.
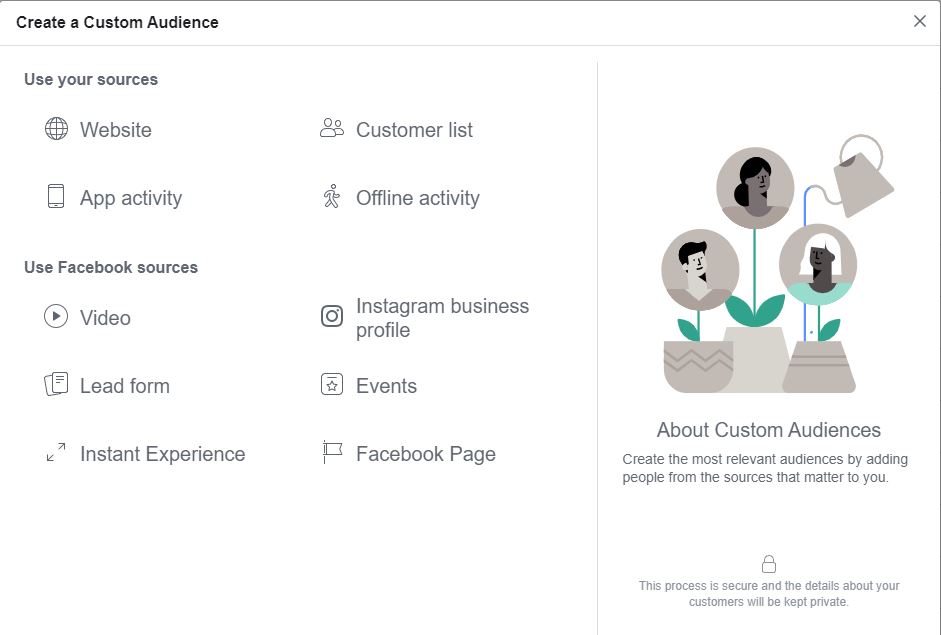
Here’s where you’ll need to consider the Custom Audience group works best for your retargeting campaign. I will go into each in detail below.
Website Custom Audiences
These are the audiences whom you’ve “pixelled” using the Facebook Pixel. You can choose different options for people who visited your website in a specific time period (eg 30 days here):
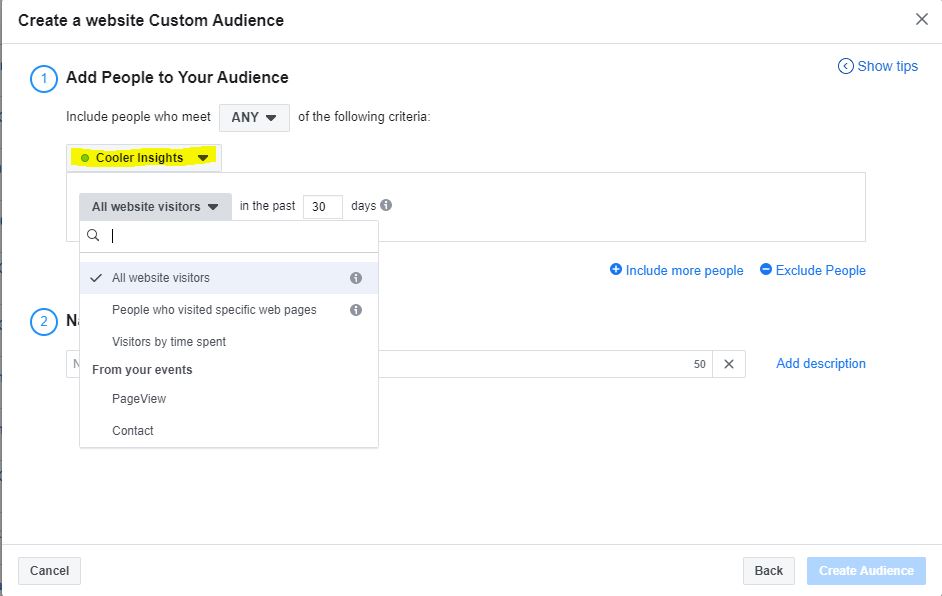
- All website visitors are those who visited any page on your website
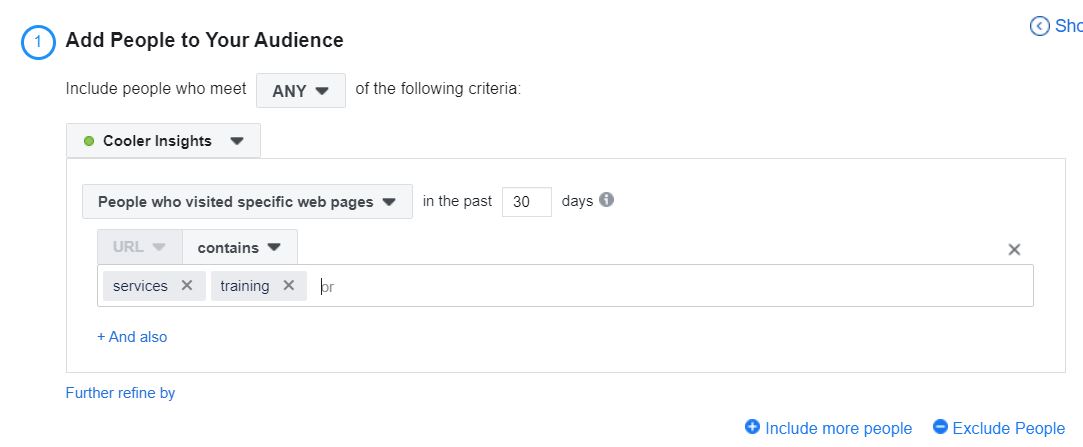
- People who visited specific web pages. Here, it may be useful to re-target people who may have visited your product or service pages.
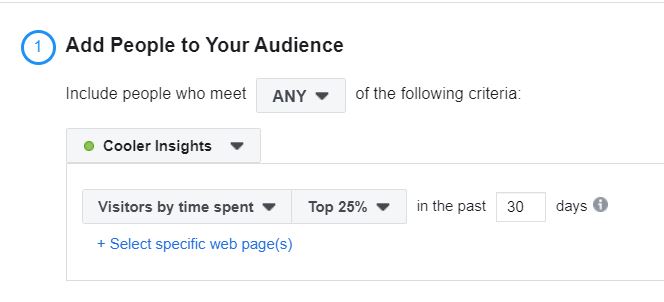
- You can also target people who visited your website by time spent. Facebook allows you to choose from the top 5%, 10% and 25%. You can also specify the specific page here.
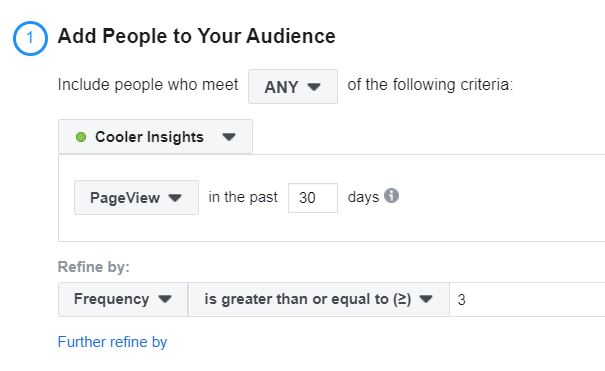
- Page view is another option that you can specify for your Website Custom Audience. Here you can set the frequency of views (usually the higher the page view, the more interested they are in your products and services).
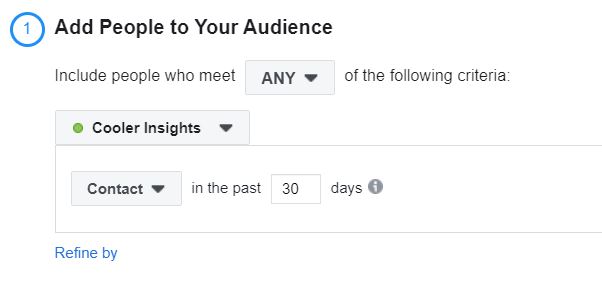
- Lastly, you can create a Website Custom Audience of people who filled up your Contact form.
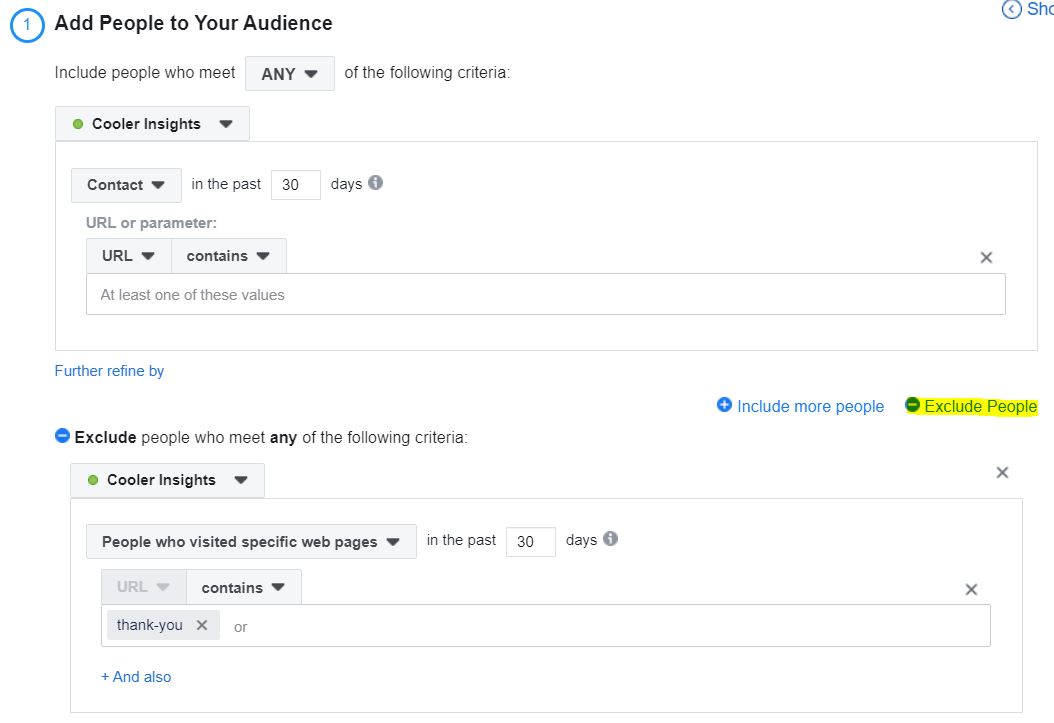
Note that you can include all of the people who meet these specific criteria into a single Website Audience if you toggle the “+ Include more people” button.
You can also “Exclude People” from your targeting – a good strategy to adopt here is to Exclude people who have already bought (usually from a “Thank You” page).
Website Custom Audiences are the gold standard for setting the right parameters for your remarketing campaigns. However, note that there is a certain minimum size for your audiences – too small and Facebook may not allow you to create that audience.
Customer List Custom Audiences
These are either your customers, leads or prospects where you already have a database of contacts.
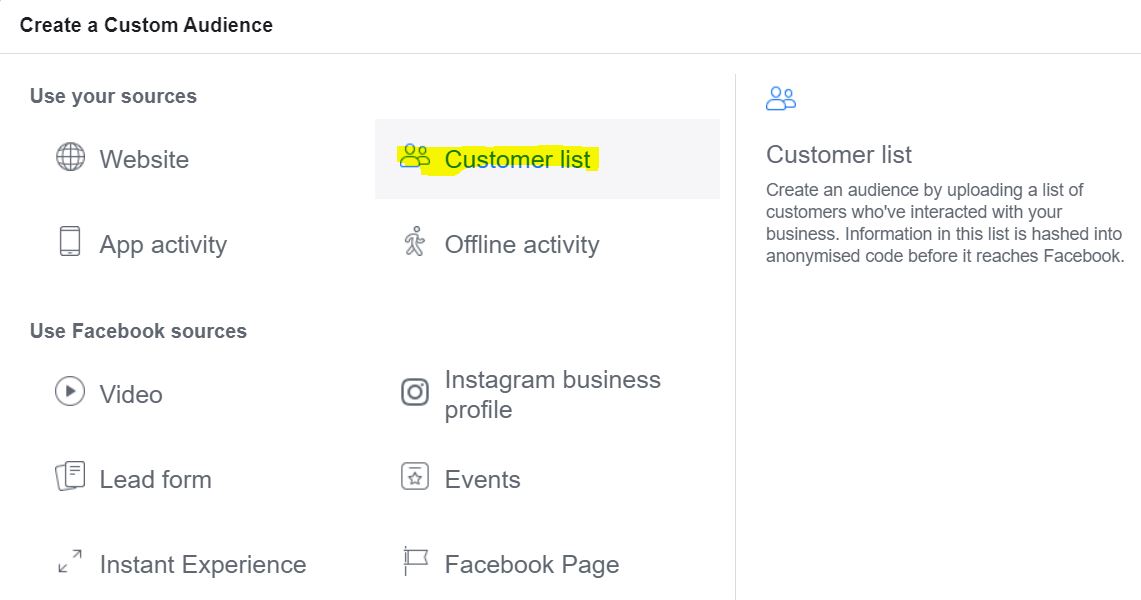
When you choose that option, it walks you through the process of uploading your list. There are several ways to do it – use their template, upload your CSV or TXT file, or import from MailChimp.
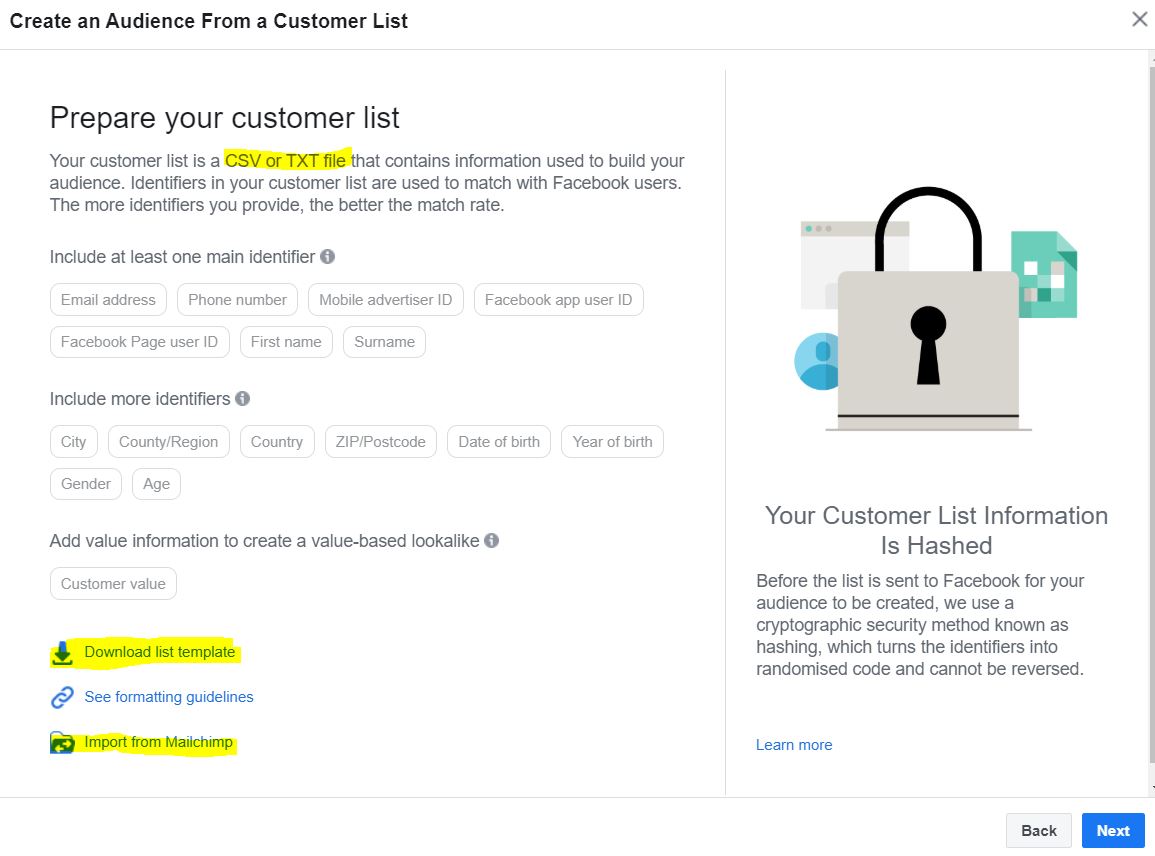
After you click on the “Next” button below, you’ll be brought to this screen. If you have a CRM system capturing customer sales value, you can include them in the list here. This will help you further segment your audience.

Next, you’ll be asked to upload your CSV file or TXT file, or you can just cut and paste the contacts into the space. Do name your customer list accordingly to ensure that it is accurate.
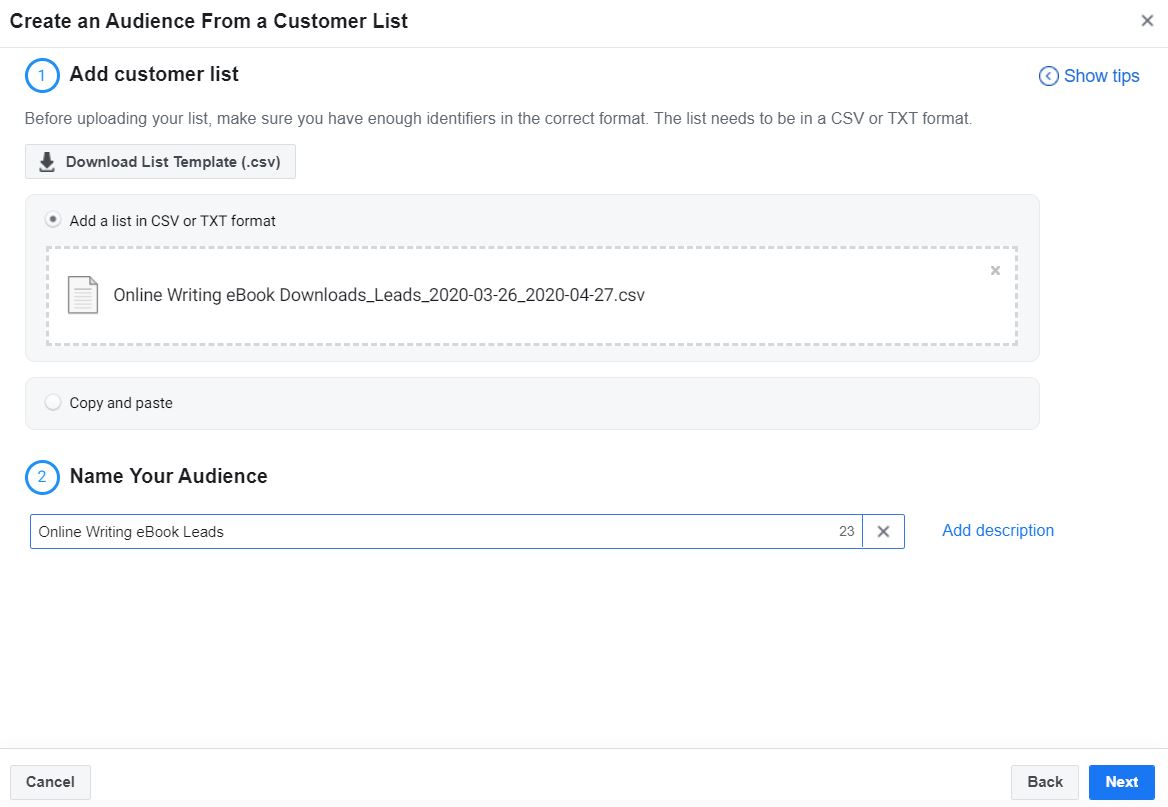
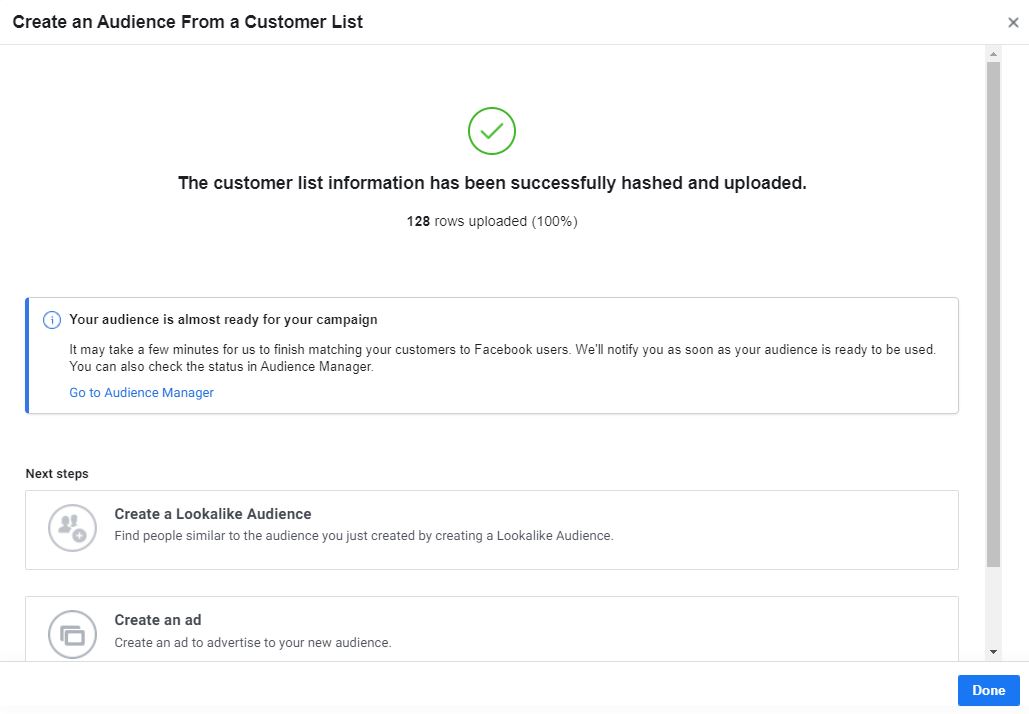
Thereafter, you’ll be asked to map the correct identifiers. Normally, email addresses would suffice, but you can add others too. Once you’re done, you can upload it and if you’re successful, a screen like the following pops up.
Facebook Source Custom Audiences
You can also create a Custom Audience from Facebook sources. This is a good strategy if your Facebook Page is fairly active, and you’d like to engage with people who have clicked on your posts, watched your videos, filled up a lead form, or interacted with your posts or ads in other ways.
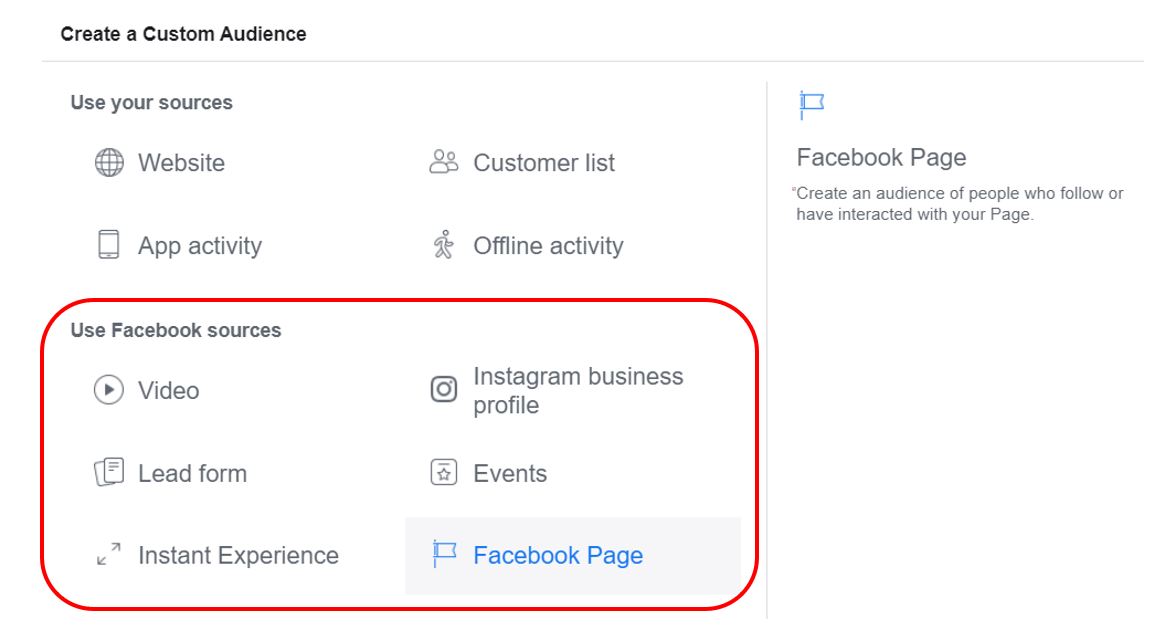
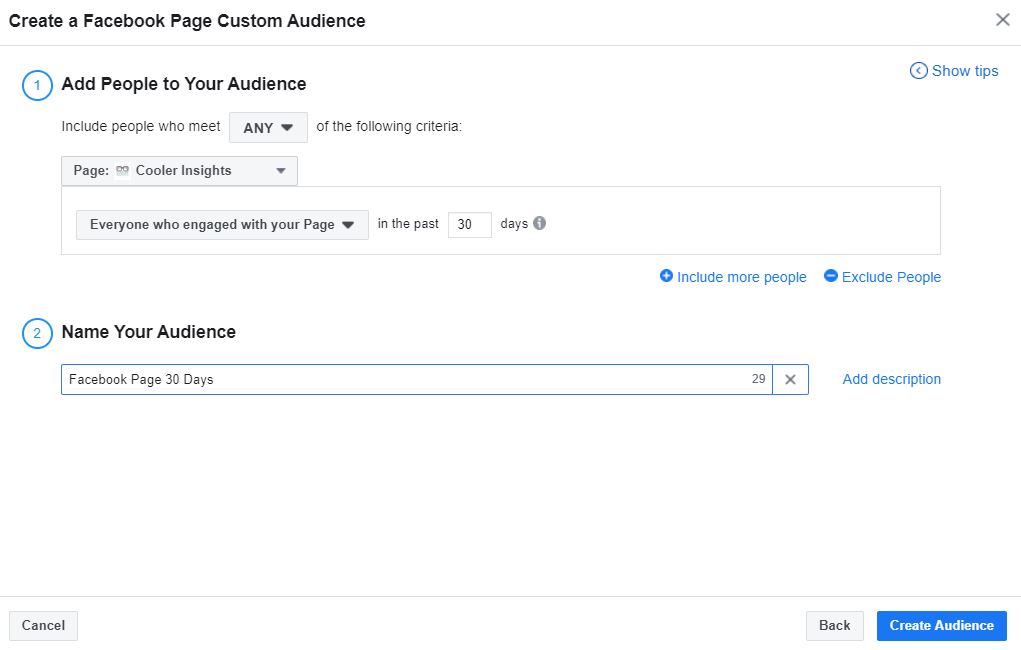
There are multiple options here, and perhaps the most basic would be choosing people who have interacted with your Facebook Page. This will allow you to choose different options as shown.
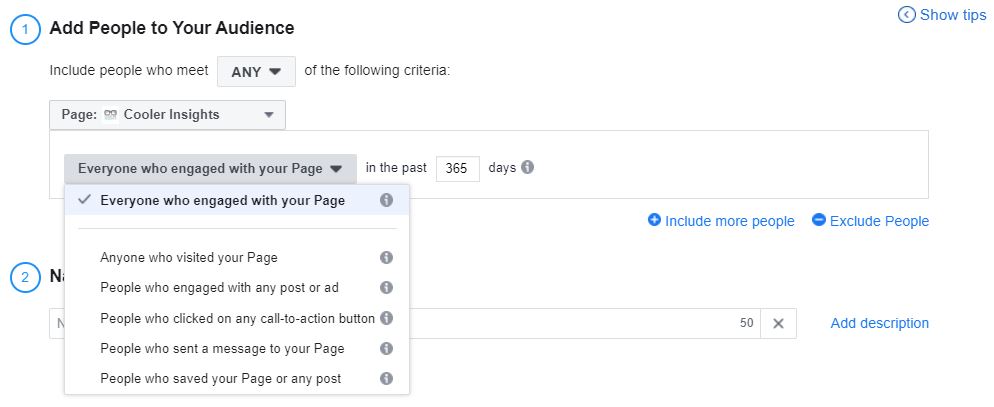
For this option, I usually like to choose people who have engaged with my Facebook Page for the last 30 days. They would constitute a warmer audience.
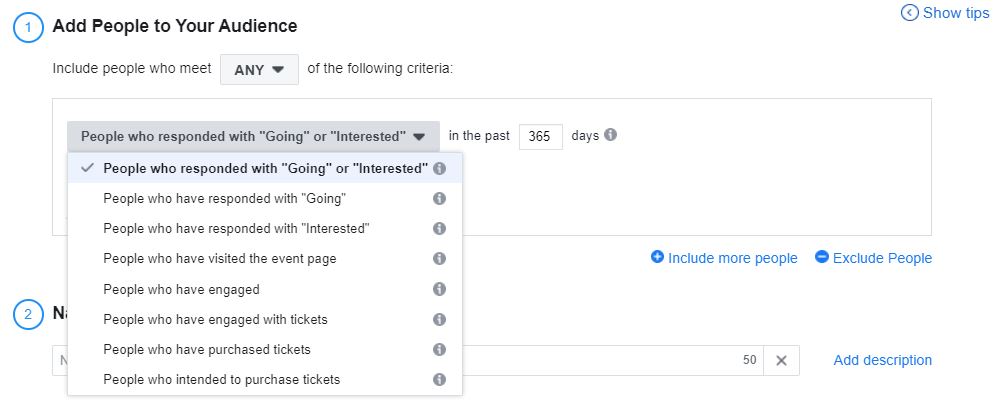
If you wish, you can also choose Events if you’ve ran a Facebook event before, and you can retarget these people with varying commitment levels.
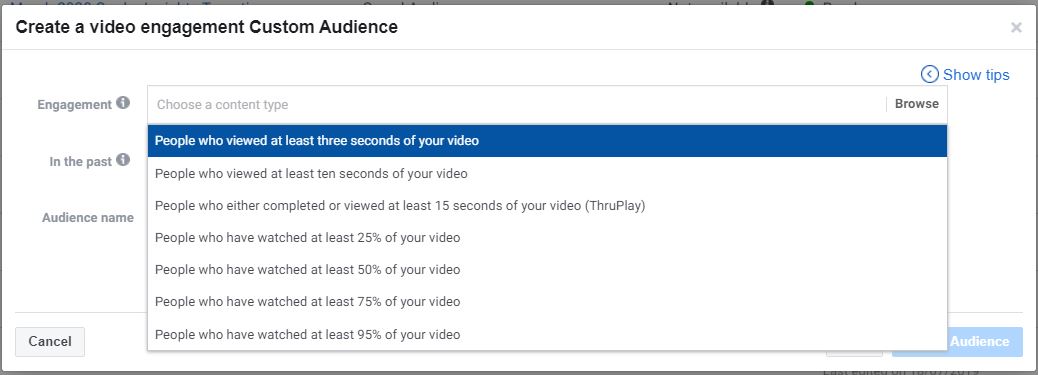
Other options include Video, ie people who have watched varying lengths of your video, as shown below.
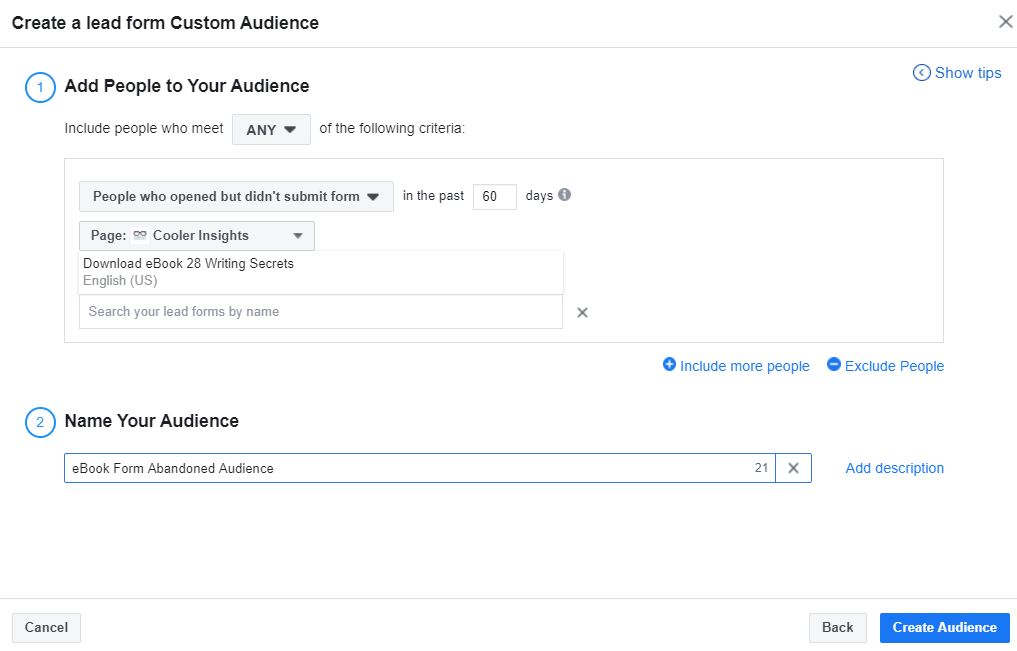
And Lead Form, where you can target People who opened your form, opened but didn’t submit, or opened and submitted the form! Here, I have created those who opened but didn’t submit form as an audience. Perhaps I can retarget them in the future to remind them not to miss out on my eBook!
Beyond your Website Audience, Customer List, and Facebook Audiences, there are other options for Custom Audiences like App activity and Offline activity. These require more integrations that you can explore if they are important for you.
#4 Five Powerful Retargeting Campaign Ideas
Phew! Now setting Custom Audiences was quite a monumental piece wasn’t it?
Now that you’ve got all your different audience groups set for re-targeting, your next step is to launch those campaigns already!
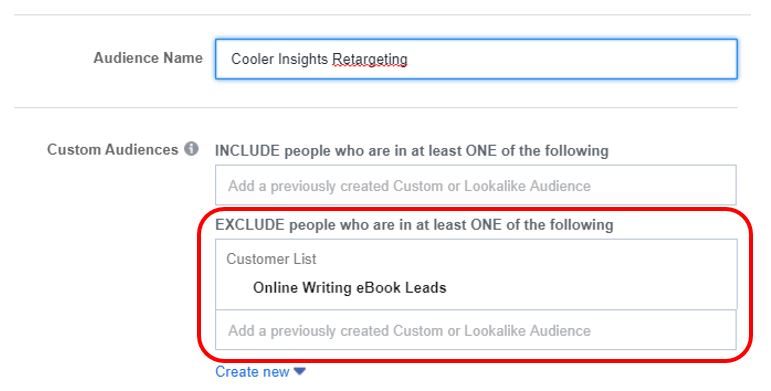
How to Exclude Existing Customers or Leads
Before you do so, it is important to learn how to exclude existing customers or leads from your targeting. You can do so by using the “Exclude” feature when you set your Custom Audiences. This will ensure that you do not keep showing the same ad to those who have already converted. Such a tactic is important for certain retargeting campaign ideas.
Now that you’re done with the pre-amble, let us get to the remarketing campaign ideas…
a) “Stop-Watching-Start-Doing” Campaigns
This is a re-targeting strategy where you can target the following Custom Audiences:
- Those who watched videos for at least 50% or more duration
- Those who visited your website for a certain time duration
- Those who visited your website for a certain frequency
Your Facebook ad message should be focused on telling them to start to take action, and stop sitting on the fence. You can include messages like the following:
- “Time to take action already!”
- “The clock is ticking…”
- “Why wait to grab this offer?”
While it can be direct and confrontational to some, this can also impose psychological pressure on others to take action.
b) Gentle Reminder Campaigns
Here’s where you gently nudge your audiences back to your funnel.
They work for those who have opened up a form but didn’t complete it, registered for an event but didn’t attend, or visited your product website pages but didn’t buy.
Your messages could include the following:
- “Did you forget something?”
- “Life gets busy sometimes…”
- “We understand that life gets in the way…”
c) Exclusively-For-You Campaigns
These are the campaigns where you can target audiences who have already committed to a relationship with you. So they may be customers or leads whom you already created a Custom Audience for.
Your messages could include the following:
- “Thank you for showing interest in us!”
- “To show our appreciation for your support, we’re pleased to offer you….”
- “Exclusively for our members and customers…”
Note that this may be effective when emails no longer work well for customers (due to poor open rates or spam filters blocking your emails).
d) You’re-Almost-There Campaigns
For cases where your prospect gets cold feet and abandoned your shopping cart (you can track a specific page), you can launch campaigns that focus on getting them back into product page.
Here, you can use Website Custom Audiences to specific pages or duration on your website, and exclude those who are already your customers.
Your messages could include the following:
- “Don’t forget these beauties!”
- “Don’t worry! We understand how its like…”
- “They’re waiting for you…”
- “You’re just a few steps away from transformation…”
e) Phased Progression Campaigns
These are multi-tiered retargeting campaigns where you can show your audiences different ads with different offers depending on how warm they are.
Your goal is to “graduate” them to a deeper relationship with your brand by offering progressively valuable and more sales-focused offers.
- Cold Audiences (Lookalike Audiences or Generic Saved Audience): Share useful and entertaining content (eg educational videos) to get them to consume your content either on your Facebook page, or your website. Your goal is to “pixel” them.
- Warm Audiences (eg Facebook Page Audiences, Video Audiences, Website Audience): Invite them to sign up to be a Lead (using a Lead Magnet) or enroll for an event.
- Hot Audiences (eg Facebook Lead Audience, Event Participants, Customer Lists): Use more promotion and sales-focused offers to convert them to buy more
Conclusion
And there you have it—a comprehensive step-by-step guide to setting up your first Facebook Retargeting or Remarketing Ad campaign.
To recap, you’ll need to do the following:
- Set up Facebook Business Manager for your account
- Install Facebook Pixel on your website/ websites
- Set up the Relevant Custom Audiences—websites, customer lists, Facebook Page
- Launch retargeting advertising campaigns
I hope that this has been useful for you. In my next article, we will look at some examples of Facebook Remarketing campaigns that have worked well.